Eigenface
问题背景
特征脸(eigenface)是第一种有效的人脸识别方法,通过在一大组描述不同人脸的图像上进行主成分分析(PCA),其本质是用一种称为“特征人脸(eigenface)”的特征向量按照线性组合形式来表达每一张原始人脸图像,进而实现人脸识别。为了提高准确率,我们尽可能取出其中含有信息较多(即方差较大)的坐标轴(基),构成(span)一个新的空间,舍弃其他维度的信息。由于新空间的维度小于原来的空间,所以把数据投影到新的空间后,可以大大降低数据的复杂度(虽然会损失少量信息)。
设计思想
首先我们需要把所有二维的人脸squeeze为一个一维的向量,$row\times col \to 1\times (row\times col)$,然后进行如下算法。
- 输入: n个1024维人脸样本数据所构成的矩阵X,降维后的维数l
- 输出:映射矩阵$W = {w_1,w_2,…,w_l}$ (其中每个$w_j(1≤ j ≤ l)$是一个特征人脸
- 算法步骤
- 对于每个人脸样本数据$xi$进行中心化处理: $x_i = x_i -\mu$,$\mu=\frac{1}{n}\sum{j=1}^nx_j$
- 计算原始人脸样本数据的协方差矩阵:$\sum = \frac{1}{n-1}X^TX$
- 对协方差矩阵?进行特征值分解,对所得特征根从到小排序$\lambda_1 ≥ \lambda_2, ≥ ⋯ ≥ \lambda_d$
- 取前l个最大特征根所对应特征向量$w_1, w_2, … ,w_l$组成映射矩阵W
- 将每个人脸图像$xi$按照如下方法降维:$(x_i){1\times d}(W)_{d\times l} = 1\times l$
每个人脸特征向量$w_i$与原始人脸数据$x_i$的维数是一样的,均为1024。
同时我们也可以将可将每个特征向量还原为$32×32$的人脸图像,称之为特征人脸,因此可得到l个特征人脸。
将每幅人脸分别与每个特征人脸做矩阵乘法,得到一个相关系数向量,包含l个系数,这个向量表示我们可以用l个特征人脸的线性组合表示任意一个人脸数据。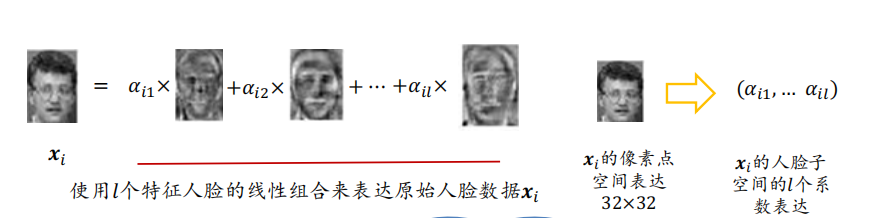
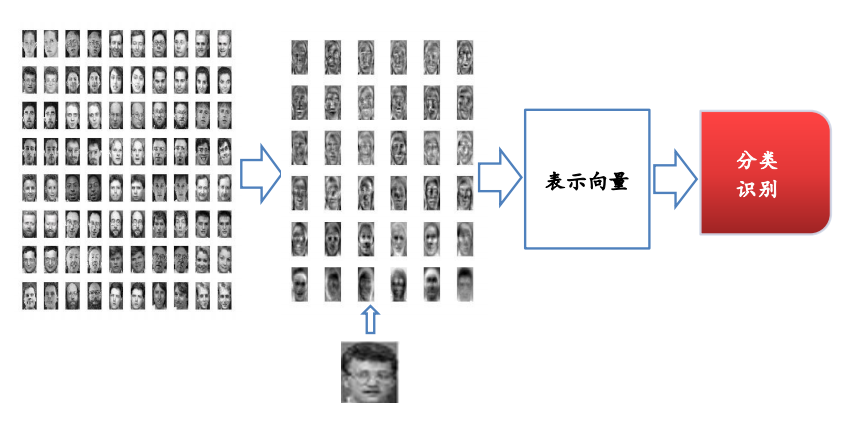
对于任意一个未知人脸,我们都可以得到其降维后的向量,然后将这个向量和数据库中的所有人脸向量进行对比,找到最接近的向量,从而进行分类
代码内容
数据集
本次实验采用的数据集来及剑桥AT&T Lab的人脸数据库ORL
,整个数据集包含来自 40 名志愿者的 280 张照片,每名志愿者的照片都包含 7 个不同的表情和角度。
数据预处理
数据预处理主要包括划分训练集和测试集,并将所有图片squeeze为一维
def spilt_data(nPerson, nPicture, data, label):
    """
    分割数据集

    :param nPerson : 志愿者数量
    :param nPicture: 各志愿者选入训练集的照片数量
    :param data : 等待分割的数据集
    :param label: 对应数据集的标签
    :return: 训练集, 训练集标签, 测试集, 测试集标签
    """
    # 数据集大小和意义
    allPerson, allPicture, rows, cols = data.shape

    # 划分训练集和测试集
    train = data[:nPerson, :nPicture, :, :].reshape(nPerson * nPicture, rows * cols)
    train_label = label[:nPerson, :nPicture].reshape(nPerson * nPicture)
    test = data[:nPerson, nPicture:, :, :].reshape(nPerson * (allPicture - nPicture), rows * cols)
    test_label = label[:nPerson, nPicture:].reshape(nPerson * (allPicture - nPicture))

    # 返回: 训练集, 训练集标签, 测试集, 测试集标签
    return train, train_label, test, test_label

datapath = './ORL.npz'
ORL = np.load(datapath)
data = ORL['data']
label = ORL['label']
num_eigenface = 200

train_vectors, train_labels, test_vectors, test_labels = spilt_data(40, 5, data,label)
train_vectors = train_vectors / 255
test_vectors = test_vectors / 255

print("训练数据集:", train_vectors.shape)
print("测试数据集:", test_vectors.shape)
训练特征脸(eigenface)算法的实现
eigenface算法的输入是人脸数据训练集和希望提取的主特征数,算法先根据测试数据求出平均脸,然后计算训练数据里每张脸与平均脸的差异,求差异矩阵的特征值和特征向量,取前 K 个特征向量,计算出 K 张特征脸,然后就可以利用这 K 个特征脸对测试人脸进行识别了。
def eigen_train(trainset, k=20):
    """
    训练特征脸(eigenface)算法的实现

    :param trainset: 使用 get_images 函数得到的处理好的人脸数据训练集
    :param K: 希望提取的主特征数
    :return: 训练数据的平均脸, 特征脸向量, 中心化训练数据
    """                                                                 #

    trainset = np.array(trainset)

    # 计算平均脸
    avg_img = trainset.mean(axis=0)

    # 计算中心化人脸
    norm_img = trainset - avg_img

    # 求协方差矩阵
    cov_img = np.cov(norm_img.T)

    # 求特征值和特征向量
    eig_val, eig_vec = np.linalg.eig(cov_img)

    # 选取最大的K个特征向量
    feature = eig_vec[:, :-k-1:-1]

    # 返回:平均人脸、特征人脸、中心化人脸
    return avg_img, feature, norm_img

# 返回平均人脸、特征人脸、中心化人脸
avg_img, eigenface_vects, trainset_vects = eigen_train(train_vectors, num_eigenface)
求特征值和特征向量可以直接调用numpy的np.linalg.eig函数,可以得到特征值和特征向量,其中得到的特征值在实数域按从小到大排列,所以在取k个最大特征值时可以直接用eig_vec[:, :-k-1:-1]取向量后k个向量
人脸识别模型
接下来,我们使用上面得到的模型在测试集上进行测试。
然后使用特征脸(Eigenface)算法对测试集中的人脸照片进行预测,我们在这里定义了 rep_face 函数,其输入是测试数据, 训练集的平均人脸数据,特征脸向量, 选用的特征脸数量。
def rep_face(image, avg_img, eigenface_vects, numComponents=0):
    """
    用特征脸(eigenface)算法对输入数据进行投影映射,得到使用特征脸向量表示的数据

    :param image: 输入数据
    :param avg_img: 训练集的平均人脸数据
    :param eigenface_vects: 特征脸向量
    :param numComponents: 选用的特征脸数量
    :return: 输入数据的特征向量表示, 最终使用的特征脸数量
    """

    representation = np.dot(image, eigenface_vects)
    numEigenFaces = np.count_nonzero(representation)

    # 返回:输入数据的特征向量表示, 特征脸使用数量
    return representation, numEigenFaces

train_reps = []
for img in train_vectors:
    train_rep, _ = rep_face(img, avg_img, eigenface_vects, num_eigenface)
    train_reps.append(train_rep)

num = 0
for idx, image in enumerate(test_vectors):
    label = test_labels[idx]
    test_rep, _ = rep_face(image, avg_img, eigenface_vects, num_eigenface)

    results = []
    for train_rep in train_reps:
        similarity = np.sum(np.square(train_rep - test_rep))
        results.append(similarity)
    results = np.array(results)

    if label == np.argmin(results) // 5 + 1:
        num = num + 1

print("人脸识别准确率: {}%".format(num / 80 * 100))
人脸重建
def recFace(representations, avg_img, eigenVectors, numComponents, sz=(112, 92)):
    """
    利用特征人脸重建原始人脸

    :param representations: 表征数据
    :param avg_img: 训练集的平均人脸数据
    :param eigenface_vects: 特征脸向量
    :param numComponents: 选用的特征脸数量
    :param sz: 原始图片大小
    :return: 重建人脸, str 使用的特征人脸数量
    """

    d = eigenVectors.shape[0]
    l = eigenVectors.shape[1]
    face = np.zeros(d)
    for i in range(l):
        face = face + representations[i] * eigenVectors[:, i]
    face.reshape(sz[0], sz[1])

    # 返回: 重建人脸, str 使用的特征人脸数量
    return face, 'numEigenFaces_{}'.format(numComponents)

print("重建训练集人脸")
# 读取train数据
image = train_vectors[100]

faces = []
names = []
# 选用不同数量的特征人脸重建人脸
for i in range(20, 200, 20):
    representations, numEigenFaces = rep_face(image, avg_img, eigenface_vects, i)
    face, name = recFace(representations, avg_img, eigenface_vects, numEigenFaces)
    faces.append(face)
    names.append(name)

plot_gallery(faces, names, n_row=3, n_col=3)

print("-"*55)
print("重建测试集人脸")
# 读取test数据
image = test_vectors[54]

faces = []
names = []
# 选用不同数量的特征人脸重建人脸
for i in range(20, 200, 20):
    representations, numEigenFaces = rep_face(image, avg_img, eigenface_vects, i)
    face, name = recFace(representations, avg_img, eigenface_vects, numEigenFaces)
    faces.append(face)
    names.append(name)

plot_gallery(faces, names, n_row=3, n_col=3)
其他函数
def show_img(img, h=112, w=92):
    """
    展示单张图片

    :param img: numpy array 格式的图片
    :return:
    """
    # 展示图片
    plt.imshow(img.reshape(h, w), 'gray')
    plt.axis('off')
    plt.show()


def plot_gallery(images, titles, n_row=3, n_col=5, h=112, w=92):  # 3行4列
    """
    展示多张图片

    :param images: numpy array 格式的图片
    :param titles: 图片标题
    :param h: 图像reshape的高
    :param w: 图像reshape的宽
    :param n_row: 展示行数
    :param n_col: 展示列数
    :return:
    """
    # 展示图片
    plt.figure(figsize=(1.8 * n_col, 2.4 * n_row))
    plt.subplots_adjust(bottom=0, left=.01, right=.99, top=.90, hspace=.35)
    for i in range(n_row * n_col):
        plt.subplot(n_row, n_col, i + 1)
        plt.imshow(images[i].reshape((h, w)), cmap=plt.cm.gray)
        plt.title(titles[i], size=12)
        plt.xticks(())
        plt.yticks(())
    plt.show()

def letterbox_image(image, size):
    """
    调整图片尺寸
    :param image: 用于训练的图片
    :param size: 需要调整到网络输入的图片尺寸
    :return: 返回经过调整的图片
    """
    new_image = cv2.resize(image, size, interpolation=cv2.INTER_AREA)
    return new_image


def read_one_img(path):
    """
    根据路径读取一张人脸图片

    :param path: 图片的路径
    :return:
    """
    # 图片路径
    # 以灰度模式读取图片
    img_sample = Image.open(path).convert('L')

    # 把图片格式转为 numpy array 格式
    img_sample = np.array(img_sample, 'uint8')

    return img_sample


def get_images(path):
    """
    读取输入的文件夹路径下的所有照片,读取输入的文件夹路径下的所有照片,将其转为 1 维,
    统一保存到一个矩阵中,然依据图片名提取标签,最终该函数将输出这个照片矩阵及其中每
    张照片的标签。

    照片的命名格式请参照"person41_01.png", 其含义为第41位志愿者的第01张人脸图像。

    :param path: 照片存放的文件夹路径
    :return: numpy matrix 格式的处理好的图片,及 list 格式的各个图片的标签
    """
    # 首先获取所有人脸图片的路径
    image_paths = [os.path.join(path, f) for f in os.listdir(path) if
                   f.endswith('png')]

    # 所有的人脸区域图片都将保存在 images 这个矩阵中
    images = np.mat(np.zeros((len(image_paths), 112 * 92)))

    trainset_labels = []

    # 对于每一张图片
    for index, image_path in enumerate(image_paths):
        # 读取图片并将其转为灰度图
        image_pil = Image.open(image_path).convert('L')

        # 把图片转为 numpy array 格式
        image = np.array(image_pil, 'uint8')
        image = letterbox_image(image=image, size=(112, 92))

        # 把 2 维的平面图像转为 1 维
        img_1D = image.flatten()

        # 把处理后的图片保存到 images 中
        images[index, :] = img_1D

        # 提取图片名作为图片的标签
        trainset_labels.append(int(image_path.split('.')[-2][-2:]))

    # 得到最终处理好的人脸图片和各个图片的标签
    trainset_labels = np.array(trainset_labels)
    return images, trainset_labels
